Showing posts with label Craft. Show all posts

12/10/2017

Easy kimono DIY*


Simple sewing at its best - you need just the most basic of sewing skills for this super easy DIY. It's also the quickest garment I've ever sewn, taking less than an hour to make. There's no paper pattern to follow, minimal cutting and pinning, and as the idea is that it's over-sized, you can't really go wrong! I used a cotton for my kimono as I wanted something with a bit of structure, but it would also look great in something light like chiffon or jersey. 


You will need

Fabric 1.5m of Coraline Mondorla Lavender Blue*  
Matching thread
Sewing machine
Tape measure/ruler
Pencil
Scissors 
Pins

How to

1. Fold your fabric in half with the inside together and the fold at the top, it should be a landscape shape.


2. Measure 28cm down from the top fold and then in 25cm to create a rectangle each side and cut out.

3. Pin together the cut sides and sew a 1.5cm seam. Press flat.


4. Find the centre of the front of your kimono and draw a line from top to bottom, then cut through the top layer of fabric only. Before you seam the front opening it's a good idea to try it on at this point, to make sure you have cut high enough. I cut another 2cm open after trying it on to get it to hang better.


5. Fold over your front opening and pin then sew a 1.5cm seam.


6. Pin and sew a 1.5cm seam along the bottom of your kimono. Turn the right way out and you're done!


Happy sewing!

*some of the materials for this project were supplied by Sew Crafty, but all tutorials and opinions are my own.


TWITTER | BLOGLOVIN' | PINTEREST | INSTAGRAM | RSS

22/07/2017

How to make a fabric pom-pom

Easy DIY fabric pom-poms to decorate your home or party


Let's face it, pom-poms are back and here to stay - which is no bad thing in my book! So in the spirit of #worldpomination I figured it was only right to make a couple of pom-pom decorations for my next Sew Crafty Design Team project, to adorn our garden, wedding, home, they could even become the new yarn bomb. And they are so quick to make that you'll have a pile of pom-poms in no time! 

Of course the gorgeous fabrics can't help but add to how happy these pom-poms make me - colourful confetti spots and hello, gingham! I think all my garden party dreams are coming true. I've used both a large pom-pom maker and even larger cardboard circles to make these so they're lovely and big. Read on for both methods...


You will need

Gingham fabric*
Confetti dots fabric*
Scissors
Pom-pom maker* or cardboard (or both)
String

To make a fabric pom-pom using a pom pom maker 

1. Cut your fabric into thin strips about 3cm wide. The more fabric strips you have the fuller your pom-pom will look, I used less than half a meter for this pom-pom.


2. Once you have a pile of fabric strips, open one side of your pom-pom maker and wrap the fabric around the arm. Repeat with the other side.


3. Cut through the middle of each side of your pom-pom maker.


4.Wrap string around the pom-pom maker and pull so that it pulls the fabric together into the centre of the pom-pom maker. Tie a few knots, then pull the pom-pom maker apart to release your pom-pom! Fluff up and trim as needed to get a lovely circular shape.


So easy.


To make a fabric pom-pom using cardboard

 1. Draw a large circle with a smaller circle inside onto cardboard and cut out to make a donut shape (dinner plates and candles make good templates), then draw around this to make a second donut.


2. Cut your fabric into roughly 5cm wide strips, I actually made a small cut and then ripped mine, which created a nice frayed effect and created a fuller pom-pom. I wouldn't do this for the smaller pom-pom though as really thin strips just curl up and hide the lovely pattern.


3. Place your two cardboard donuts (damn, I really want a donut now) on top of each other and wrap with the fabric.


4. Cut though the edge of the donut using the gap between the two pieces of card as a guide.


5. Slide some string between the two pieces of card, pull tight and then tie around your pom-pom. Leave a long tail for hanging.


I love how they look hung outdoors in particular, so colourful and fun! They'll definitely be making an appearance at our wedding and after that I think they'll take up residence in this tree on sunny summer days.


*some of the materials for this project were supplied by Sew Crafty, but all tutorials and opinions are my own.


TWITTER | BLOGLOVIN' | PINTEREST | INSTAGRAM | RSS

27/05/2017

How to make a bunting cake topper*

Easy DIY wedding cake bunting


You just can't have a village hall wedding without bunting, eh? At least that's true in my book. So it's only fair that the wedding cake gets a bit of the bunting treatment too! This super easy Mr and Mrs bunting is quick and inexpensive to make, plus you can personalise it with your name or chosen message - 'Just Married' or any cake related quote would also work perfectly.

Now you may be wondering why I've photographed it sitting in a teacup rather than on a cake (!), as I'll be using this at my own wedding later this year I wanted to keep the full reveal for guests on the day. But I'll be sure to share a picture of how it looked after the wedding! 


You will need

Hessian ribbon*
Bondaweb*
White thread*
Hemp cord*
Needle
Scissors
Pencil and ruler
Bamboo kebab skewers 
Iron

How to make your bunting cake decoration

Cut a long length of your ribbon and iron in half. Then using a pencil and ruler mark out your bunting triangles on one side of the ribbon. My triangles are 2.5cm wide.


Using 3 strands of white thread embroider a letter or heart onto each triangle.


Measure and cut a length of bondaweb to go inside your ribbon, make it about 0.5cm thinner than your ribbon.


Iron the rough side of the bondaweb inside of your ribbon leaving the 0.5cm gap near the centre fold.


Peel of the bondaweb backing and iron the other half of the ribbon to the bondaweb.


Cut your triangles out. Thread your hemp cord onto a large eyed needle and thread through your bunting triangles.


Tie either end of each bunting skewer, arrange so that you're happy with the bunting drape and cut excess thread. I've kept mine long in the pictures in case I need to make any adjustments when we put it in the cake.


Ta-dah! A cake decoration fit for a new Mr and Mrs. Obviously you could also make cake bunting for birthdays, anniversaries, Fridays, generally any occasion involving cake! 


*some of the materials for this project were supplied by Sew Crafty, but all tutorials and opinions are my own.


TWITTER | BLOGLOVIN' | PINTEREST | INSTAGRAM | RSS

21/04/2017

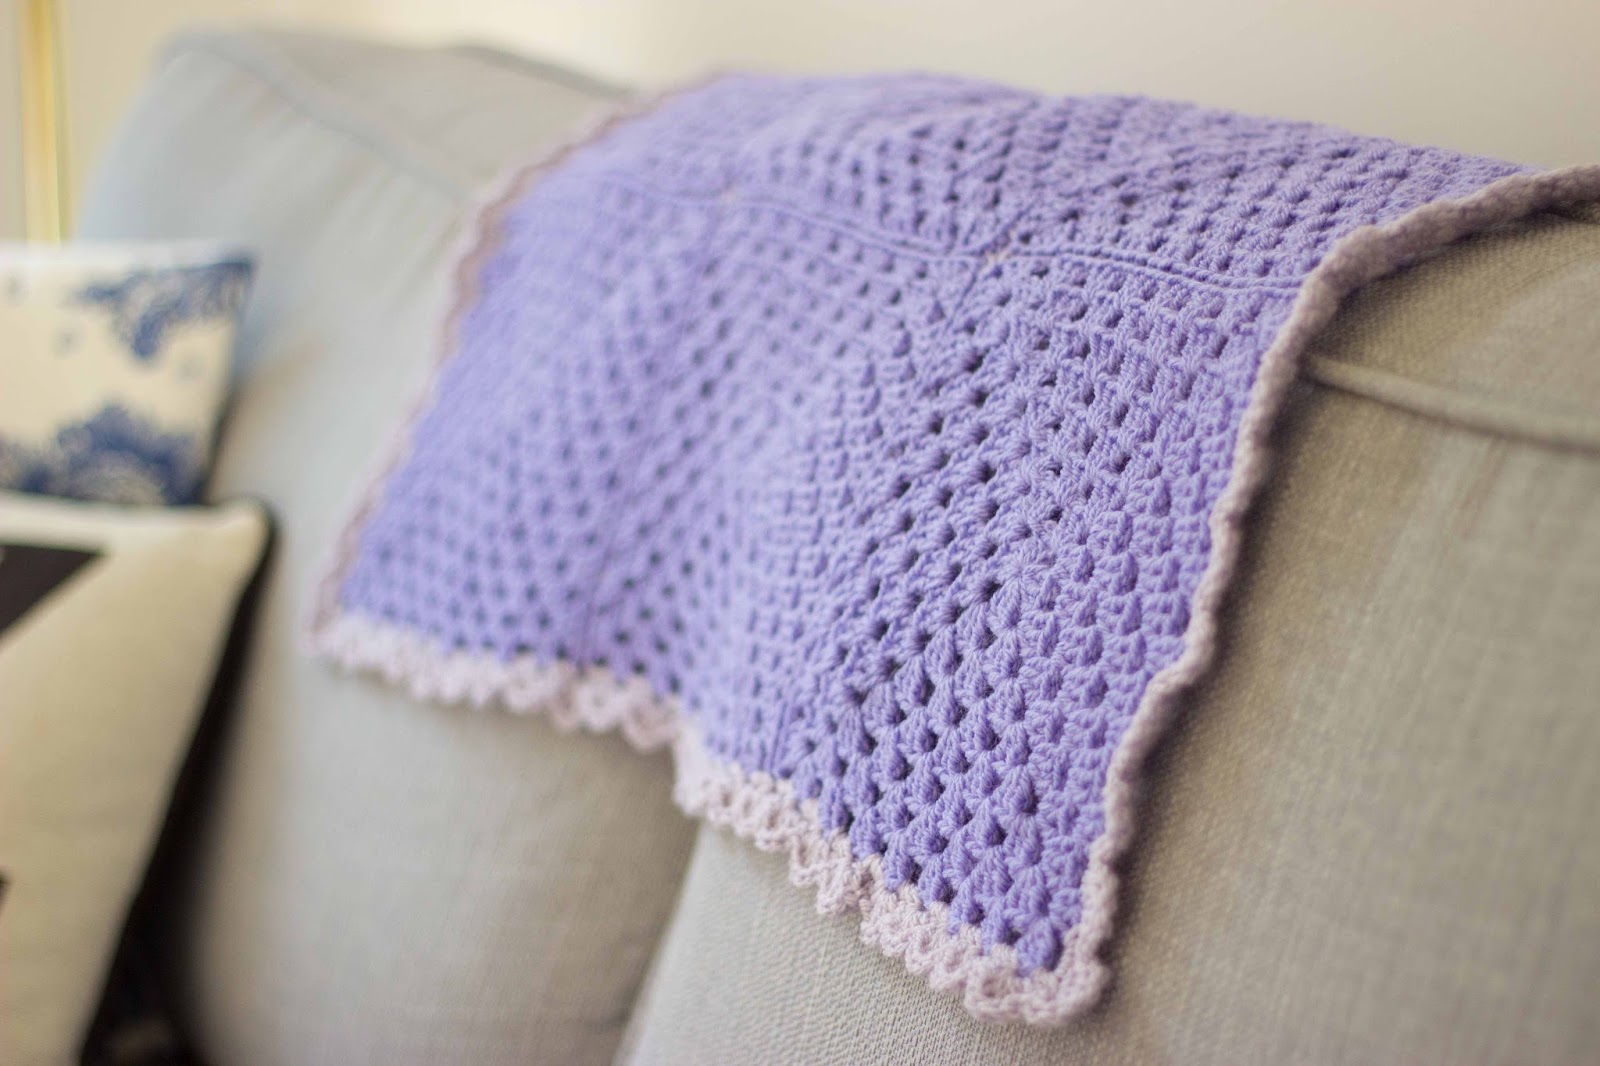
Crochet cat blanket | a pattern

Easy crochet pet blanket - free pattern

You could say I've well and truly caught the crochet blanket bug as I'm back with a second blanket pattern less than a month after my first. However, this is such a quick and easy make I just couldn't resist. Also don't worry, I have remembered that I don't actually have a cat (yet), inspired by Leanne from This Little Space of Mine, this little blanket will be headed to my local Cat's Protection Centre. 

The pattern is a super simple eight round granny square joined with a slip stitch. This was one of those patterns that just evolved as I crocheted, if I'd planned things a bit more I think I'd have done a seven round square and then used the join as you go method for the eighth round, as it would make the pattern even quicker. I'll try that for the next one! As it is the cat blanket took just a few evenings to make and used up some stylecraft special DK in Lavender, which I seem to have a particular excess of. The border is Parma Violet also stylecraft special DK.


4mm hook

Ch - Chain
Tr - Treble crochet
Sl st - slip stitch

Round 1 - Ch 4, sl st to form a magic loop

Round 2 - Ch 3, then tr 2 into the centre of the magic loop ch 2, *tr 3, ch 2 three more times. Until you have four sets of trebles. Sl st into top of the chain 3.

Round 3 - Sl st along to the corner, then ch 3, tr 2, ch 2, tr 3 into same space. *tr 3 into next space, ch 2, tr 3 into same space. Repeat three more times until you have eight sets of treble 3. Sl st into top of ch 3 to join, then break yarn.

Continue in pattern until you have eight rounds on your granny square. 

Make six granny squares.
Join together with a slip stitch through the back loop only of each square.
The finishing touch is the gorgeous scallop border, I used this pattern by Kimberly Pye.


Insert cat below!
I'd love to know if you've made a blanket for your pet, or donated one to a animal shelter before. Happy crocheting! 


TWITTER | BLOGLOVIN' | PINTEREST | INSTAGRAM | RSS

05/03/2017

Easy DIY embroidery hoop wedding table numbers


Make these simple embroidery hoop table decorations in no time - a stylish addition to your wedding or party


If you read my thoughts for 2017 post back in January you'll have seen that I'm getting married this year; so when it came to picking my first Sew Crafty Design Team project of 2017, it had to be a wedding make! Right at the beginning of planning I fell in love with this image of an embroidery hoop table centerpiece on pinterest (the photo simply links to a photographers website), but luckily I knew I could make my own to add a fun, handmade vibe to our village hall reception.

These are so simple to make and only took about an evening per number, plus the relaxing nature of hand sewing helps calm the pre-wedding nerves. They're inexpensive and won't break the bank either. Plus you could totally hang one on your wall after as a keep sake and then reuse the other hoops - win, win! 


You will need

Wooden embroidery hoops* x 15cm - one for each table
Embroidery thread* in blue 130, black - 403 and mustard - 307
Linen fabric
Needle 
Scissors
Stripe cotton ribbon*
Cotton lace*
Pencil/water erasable pen

How to

1. Cut your fabric into a square a few centimeters larger than your embroidery hoop.

2. Draw or trace your number onto your fabric and insert into the hoop.

3. Using simple backstitch embroider your number with the embroidery floss. I used the floss at full thickness to speed up the process. Keep the back as neat as possible by weaving in your ends as this will also be on display. 

4. Remove any trace of pencil of the erasable pen and iron if needed.

5. Wrap a section of the outer hoop with your lace or ribbon then re-inset the fabric with the number in the centre.

6. Make sure you're completely happy with the placement of the number and lace (as you won't be able to move it after the next bit..) then cut the excess fabric from the back of the hoop, keeping as close to the wooden edge as possible. 

Voila! Stand them against flower filled jam-jars for a pretty table decoration. You could use any left over ribbon and lace to tie around flower vases and candle holders to tie the whole thing together. If you wanted to go even further you could spray paint the hoops first, use patterned fabric, sparkly threads or even beads, the opportunities to make them your own are endless.


Happy crafting!

*some of the materials for this project were supplied by Sew Crafty, but all opinions are my own


TWITTER | BLOGLOVIN' | PINTEREST | INSTAGRAM | RSS

30/12/2016

Most popular posts of 2016 – your favourites

Top 5 posts of 2016

This is one of my favourite posts to write because it gives me a chance to look back over the year and rediscover all of my favourite DIYs, makes and bakes  - although these are your favourites (according to google analytics) I’m super pleased that lots of them are my favourites too! 

The quilted patchwork cushion cover makes me smile whenever I sit on it (I’m pleased to report it’s very comfy) and we still practically live off Gary’s oat bars - we’re going to need a lot to make up for all the Christmas chocolate too. I’m also happy to see that ‘Four simple ways I’m going to make my life better’ has made the top 5; I was unsure about hitting publish on that one as it was a bit different to my usual style and while I admit I have kind of gone back to eating lunch at my desk, I’ve definitely stuck to the others and feel a lot better for it.

Here’s to a happy, healthy and crafty 2017!


1. How to sew a quilted patchwork cushion cover


2. Crochet iPad case – free pattern


3. Gary’s healthy honey oat bars


4. Four simple ways I’m going to make my life better


5. Crochet tissue box cover

What's your favourite thing you've made, done or baked in 2016? Let me know in the comments.

Hope you have a happy New Year!


TWITTER | BLOGLOVIN' | PINTEREST | INSTAGRAM | RSS

LinkWithin

Related Posts Plugin for WordPress, Blogger...